Bosses Guide
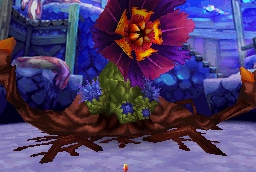
| Tangle Bloom |
| Stats: |
~300 HP, Weak against Fire |
| Location: |
Abandoned Mine |
| Rewards: |
143 exp, 77 coins, 1 Psy Crystal |
| Attacks: |
Basic Attack - Low Damage
|
| Strategy: |
As the first boss battle, Tangle Bloom doesn't pose much of a challenge. Isaac and Garet will do most of the damage, and once you have enough Djinn on standby, you will be instructed to
unleash a summon. |
|
 |
| Dim Dragon |
| Stats: |
~320 HP, Weak against Fire |
| Location: |
Psynergy Training Grounds |
| Rewards: |
179 exp, 60 coins, 1 Nut |
| Attacks: |
Basic Attack - Low Damage
Scary Jinx - Curses a target, who will die in several turns
Gasping Breath - Low damage to all targets
Pebble / Sizzle Breath - Medium damage to single target
Repairs - Dim Dragon heals a small amount of HP
Out of Order - Dim Dragon misses a turn |
| Strategy: |
This is the first real boss battle in the game, and without the help of Isaac and Garet, it might be slightly challenging for some players. The key to quickly defeat it is to unleash all of your Djinn as quickly as possible and unleash your strongest Summons before it has the change to use Scary Jinx and remove one of your characters. Karis' Fresh Breeze psynergy is also effective. |
|
 |
| Dim Dragon Plus |
| Stats: |
~500 HP, Weak against Fire |
| Location: |
Psynergy Training Grounds |
| Rewards: |
267 exp, 80 coins, 1 Nut |
| Attacks: |
Basic Attack - Low Damage
Scary Jinx - Curses a target, who will die in several turns
Gasping Breath - Low damage to all targets
Pebble / Sizzle Breath - Medium damage to single target
Repairs - Dim Dragon heals a small amount of HP
Out of Order - Dim Dragon misses a turn
Djinn Burp - Sets all of a character's Djinn into Recovery mode |
| Strategy: |
After clearing the Training Grounds, you have the option of re-running the course and fighting the Dim Dragon again (you will recieve a Water of Life for your efforts). It has the same abilities as before, but has more HP and a new attack. |
|
 |
| Sand Prince |
| Stats: |
~1100 HP |
| Location: |
Ayuthay |
| Rewards: |
1540 exp, 825 coins, 1 Sand Prince Stone (bestows Arid Heat) |
| Attacks: |
Basic Attack - Low Damage
Earthquake - Earth damage to all targets, medium damage
Eruption - Fire damage to 3 targets, medium damage
Arid Heat/Blast/Scorch - Fire damage to 3 targets |
| Strategy: |
His basic attack is relatively weak, so HP shouldn't be a major issue in this fight, but be careful as his Eruption psynergy will do heavy damage to Karis and Rief. In order to defeat him quickly, you can summon Nereid and Judgment (if you have acquired all Djinn thus far) and attack him with psynergy for a turn or two. |
|
 |
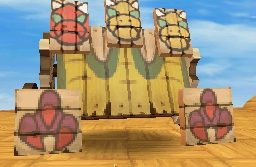
| Ku-Tsung and Ku-Embra |
| Stats: |
~830 HP (Ku-Tsung) and ~900 HP (Ku-Embra) |
| Location: |
Barai Temple |
| Rewards: |
1647 exp, 1 Plump Dumpling, 1 Rice Ration |
| Attacks: |
Ku-Tsung:
Basic Attack - Medium Damage
Gunpowder Bomb - Hits 3 members, medium damage
Drgon Spark - Hits 3 members, high damage
Pure Hatred - High damage, Ku-Tsung takes 50% damage
Gong of Battle - Slightly raises enemy defense
Rice Ration - Heals a small amount of HP
Ku-Embra:
Basic Attack - Medium Damage
Fireworks - Sets a random Djinn to standby
Cyclone Slash - Hits 3 members, medium damage. Ku-Embra is deluded
Inspiring Speech - Slightly raises enemy attack
Zealous Fury - High damage |
| Strategy: |
Focus on taking out a single enemy first, and the battle will be a lot easier (it would probably be best to target Tsung first since he has less HP). Ensure that none of your party members' HP falls to low levels as some of their attacks can deal large amounts of damage. Use your Djinn and Summons wisely, and this battle shouldn't be a major challenge. |
|
  |
| Ice Queen |
| Stats: |
~1600 HP, Weak against Fire |
| Location: |
Harapa Ruins |
| Rewards: |
3122 exp, 1606 coins, 1 Ice Queen Stone (bestows Cold Snap) |
| Attacks: |
Basic Attack - Low Damage
Break - Removes all party stat bonuses
Frostbite - Targets 3 characters, High damage
Ice Missile - Targets 3 characters, Medium damage
Icy Kiss - Medium damage, can instantly kill target (rare chance)
Illusion Veil - Targets whole party with delusion
Ply Well - Recovers a sizeable amount of HP |
| Strategy: |
Ensure that you keep all of your party members well healed and this battle shouldn't be a problem. You can take advantage of her Break skill by casting stat buffs in order to get her to use Break rather than attack abilities from time to time. Fire attacks will do high damage against her, so focus on using Mars Psynergy/Djinn/Summons. |
|
 |
| Sludge + Skulls |
| Stats: |
~1900 HP (Sludge), 300-500 HP (Skulls), Weak against Wind |
| Location: |
Phantasmal Bog |
| Rewards: |
EXP and Coins recieved depends on number of skulls defeated |
| Attacks: |
Sludge:
Call Skull - Summons a skull (maximum of 3)
Crush - Medium damage
Tail Slap - Targets 3 characters, medium damage
Healing - Heals around 300 HP
Skulls:
Sludge Shield - Protects Sludge from attacks
Condemn - Chance to curse target
Witchlight - Low to medium damage |
| Strategy: |
This battle isn't too difficult if you are adequately levelled. If you want to end the battle quickly, focus your attacks on Sludge and take him out, then clear out the remaining skulls. Whenever the Curse skull shows up, be sure to take it out as quickly as possible, as cursed characters will die in a few turns. If you want some extra experience and coins, keep targeting and killing the skulls, and allow Sludge to re-call them. You'll get extra rewards for each skull killed. |
|
 |
| Mountain Roc |
| Stats: |
~3,100 HP, Weak against Wind |
| Location: |
Talon Peak |
| Rewards: |
12,852 exp, 140 coins |
| Attacks: |
Potent Cure - Heals itself for around 300 HP
Seismic Stomp - Hits 3 characters, high damage
Shriek - Hits 3 characters, low damage (can reduce attack)
Stone Molt - Roc heals 150 HP every turn
Stone Spire - Venus damage to 3 characters, medium damage
Upward Blast - Targets 1 character, medium to high damage |
| Strategy: |
This fight might be your most difficult so far - the Mountain Roc possesses a lot of HP and can hit for heavy damage. Additionally, the Roc can use the move "Stone Molt" to regenerate HP every turn (it'll last the entire fight, and he has a habit of using it right at the start). You can counter this move by using the Psynergy "Slap" against it.
Otherwise, the battle is fairly straightforward - use Djinn and attacks that reduce enemy defense and attack if you can, and just hit it with Jupiter Psynergy and summons. |
|
 |
| Blados and Chalis |
| Stats: |
~1,930 HP (Blados - Weak against Fire), ~1,830 HP (Chalis - Weak against Water) |
| Location: |
Belinsk Ruins |
| Rewards: |
15,702 exp, 2280 coins, Spark Shuriken, Illusion Perfume |
| Attacks: |
Blados:
Basic Attack - Low Damage
Firecracker - Hits 3 characters, low to medium damage
Psy Grenade - 3 characters lose a small amount of PP
Punish - Low to medium damage
Shadow Shield - Increases Blados's defense
Spark Shuriken - Low damage, stuns a single character
Chalis:
Basic Attack - Low Damage
Firecracker - Targets whole party, medium damage
Illusion Perfume - Chance to delude 3 characters
Psy Grenade - 3 characters lose a small amount of PP
Scornful Caress - Medium damage
Shadow Shield - Increases Chalis's defense
Vial - Heals ~350 HP
|
| Strategy: |
Compared to the Roc, these two should give you no trouble at all. Simply hammer away at one of them (Blados should be targetted first since he is slightly stronger) with your Djinn/Psynergy/Summons, and then target the other once the first falls. |
|
  |
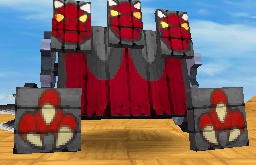
| Chaos Hound, Blados and Chalis |
| Stats: |
~3,400 HP (Chaos Hound - Weak against Earth), ~3000 HP (Blados - Weak against Fire), ~2900 HP (Chalis - Weak against Water) |
| Location: |
Apollo Sanctum |
| Rewards: |
|
| Attacks: |
Chaos Hound:
Basic Attack - Low Damage
Dark Blow - Low to medium damage
Deadly Gas - Hits 3 characters, medium damage, chance of inflicing Venom
Wicked Howl - Jupiter damage to a single character, medium damage, inflicts Paralysis
Blados:
Basic Attack - Low Damage
Firecracker - Hits 3 characters, low to medium damage
Psy Grenade - 3 characters lose a small amount of PP
Punish - Low to medium damage
Shadow Shield - Increases Blados's defense
Spark Shuriken - Low damage, stuns a single character
Chalis:
Basic Attack - Low Damage
Firecracker - Targets whole party, medium damage
Illusion Perfume - Chance to delude 3 characters
Psy Grenade - 3 characters lose a small amount of PP
Scornful Caress - Medium damage
Shadow Shield - Increases Chalis's defense
Vial - Heals ~350 HP
|
| Strategy: |
You have two options to complete this battle: either kill the Chaos Hound, or kill both Blados and Chalis. Either works, but it might be slightly faster to simply focus all of your attacks on the Chaos Hound. Blados/Chalis remain largely the same as during your previous encounter, but with slightly stronger attacks and more HP. Either way, if you are adequately levelled, you should have no problem in this fight. |
|
 |
| Chaos Chimera |
| Stats: |
~10,000 (Weak against Wind) |
| Location: |
Apollo Sanctum |
| Rewards: |
|
| Attacks: |
Basic Attack - Low Damage
Chaos Upheaval - High damage to 3 targets
Darksol Gasp - Medium damage to 3 targents, inflicts Haunt
Djinn Blast - Drains all djinn for 1 character
Firecracker - 3 targets, low to medium damage
Psy Grenade - 3 targets, small PP damage
Retribution - 3 targets, low to medium damage (chance of KO)
Shadow Clash - Hits whole party for medium to high damage
Shadow Shield - Increases Chimera's defense
Seismic Stomp - 3 targets, high damage
Wicked Howl - Low damage
Vial - Heals for 500 HP |
| Strategy: |
This fight can be very difficult, especially if you are underlevelled (having your main party at ~50 seems to be a safe benchmark), but with a little bit of planning you should be able to defeat the Chaos Chimera on your first attempt. Ensure that all of your party are completely healed after the previous battle, and set all of your djinn so that you can start the battle by unleashing a barrage of summons (Thor and Eclipse are particularly effective due to it's weakness to wind, as are Jupiter psynergy attacks).
At the start of the battle, the Chimera will use relatively weak attacks, but as you reduce it's HP, it will start using stronger techniques such as it's Seismic Stomp and Shadow Clash. If you have it, Rief's Pure Wish will make the battle a lot easier, but you can use Karis's Healing Gust as well.
If he uses Djinn Blast, it may be wise to switch out the effected character for a reserve.
Heal regularly, make sure that your most useful Djinn are allocated to your main party members and ensure that you have a few Water of Lifes handy for characters who don't have the Revive psynergy/an available Djinn with the ability, and you should be able to slowly but surely defeat this boss. |
|
 |
|